


This is a project guide with information on how to construct a backyard ice rink. If you already know what type of plastic you are looking for and are ready to shop, use the 'To Webstore' button above to head to the shop.
Below, we offer a tutorial for how to build your own backyard ice rink liner. The first thing you will have to do is decide what kind of plastic sheeting you want to use for your ice rink. If you want the most economical choice, you can use our 6 mil clear standard plastic sheeting, which many of our customers have used to great result.
If you are concerned about reusability, punctures, or tears, you may want to consider 10 mil clear standard. Another similar quality choice would be 6 mil string reinforced, which boasts an additional layer of string scrim and fused molten polyethylene that makes it highly tear resistant and puncture resistant. If you want the very strongest and most durable that you can use winter after winter, we recommend 10 mil string reinforced.
• Large level area for construction
• Wooden planks, 2"x10"x10’, possibly 2" x 6" x 10' instead if you have very flat ground
• Wooden stakes
• Rebar stakes
• String
• Drill and deck screws
• Staple gun and staples
• Plastic sheeting (see above for recommendations)
• Pea gravel (if leveling is required)
• Water
• Climate with freezing weather
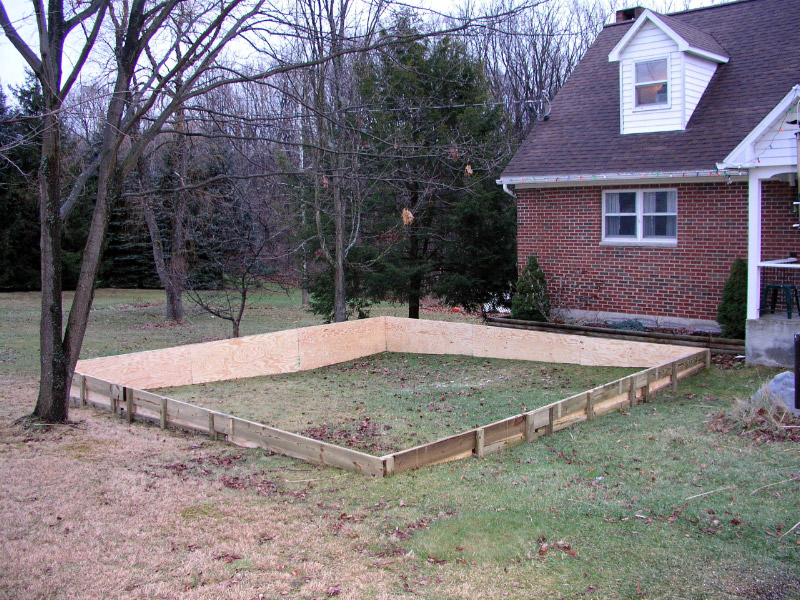
The basic idea is to use your boards to build a rink frame that is 6-10" off the ground and firmly reinforced. There is a lot of flexibility with how you want to construct this, from simple wooden stakes and boards to a super-strong rebar and pea gravel fortress. We urge you to remember the weight of the water and the force of expanding ice - this construction need to be solid. If you have very flat ground, you can opt for something simple; if you have slightly sloped ground (as most yards do) you will need to carefully plan your construction to make sure the top is level. You may choose to level the ground inside the frame using pea gravel (leave plenty of space within the enclosure for the tarp and water.) Finally, place the tarp carefully and very securely into place before filling it with water and waiting for a freeze. Read our detailed instructions below for more.
1. Measure an accurate rectangular area the size of desired rink.
2. Water will seek a level. Drive a temporary stake at each corner. Connect each stake with a taut string to measure level. Adjust string until it measures level at all points. String should be approximately 10 inches from ground at lowest point.
3. Lay out wooden planks around outside perimeter of string/stakes. Planks should be 2 inches thick and 6-10 inches wide. You may have to cut some of your board to meet the elevation changes on the ground, following the level line of the string along the top.
4. Place permanent stakes on outer side of plank walls. Starting at any corner, drive a permanent wooden stake into ground, removing temporary stake if necessary. Stand first plank on edge against stake. Align top of plank to level of string. Attach plank to stake firmly with long deck screws.
5. At unattached end of plank, drive second stake, allowing room to overlap for next plank. Level to string. Attach plank to stake with screws.
6. Repeat for each plank, until level wall of planks, reinforced by stakes, is completed.
7. Drive rebar stakes into the ground along the outside of rink for extra strength, if desired. The larger your rink is, the more strongly we recommend rebar stakes.
8. Cut off all stakes to level of planks or lower. Remove temporary corner stakes and string.
9. Fill entire rink half-full of pea gravel (not necessary if you have flat ground.) Level thoroughly.
10. Cover entire rink with plastic sheeting. Plastic sheeting should be large enough to cover pea gravel base, and then up and over plank walls. Keep wrinkles in plastic to a minimum. Press plastic liner into base completely to edges and fold up walls.
11. Fold all corners neatly. Fold and staple 10 mil woven plastic sheeting liner neatly around outside edge of plank walls. It is not easy to form plastic sheeting into the shape of a box, but it is crucial to the project. Remember the massive weight of water that will push into this box. Weak construction will ensure failure. Be careful not to snag or rip plastic. Trim excess liner if needed.
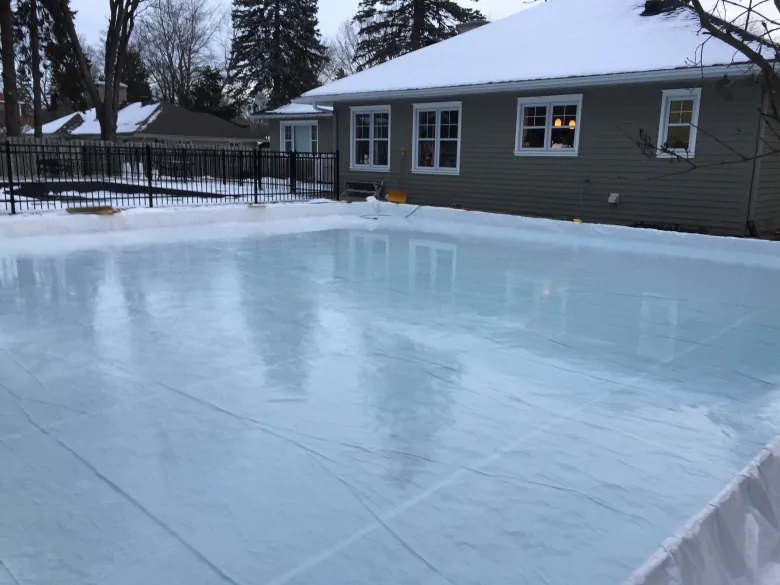
12. Fill with water and wait for hard freeze.